
The Grand Canyon National Park is a heavily protected area and as such activities and tourist attractions are fairly limited. This is to help protect the natural wonder of the Park and keep the Wild, Wild. This makes the number one thing to do at the Grand Canyon National Park, Hiking. The Park is littered with trails that showcase the absolute best of the Park and the stunning Grand Canyon.
The Best Hikes in the Grand Canyon National Park are a mixed bag of simple Day hikes, Tourist Paths, and extreme hikes that take you down sheer rock faces over a mile down to the base of the canyon and back up. There is something for everyone and Hiking in the Canyon is extremely rewarding. Even the easy and flat South Rim Trial exposes you to some of the most stunning scenery you could possibly imagine. We take you through all the top Hiking Trials in the park and give a few tips on how to hike them both safely and effectively.
Best Hikes In The Grand Canyon National Park
There are several types of hikes, from easy flat, paved paths to epic treks deep into the wilderness on remote trails that take a few days. There are several campsites along the route, and camping is only permitted in designated Campsites.
While Wild and remote a lot of trails have Rangers Stations, water top-ups, and covered rest areas where you can get out of the sun. The trails are often very heavily trafficked and unless you head deep into the wilds you are unlikely to be alone for long.
On the whole, the Hiking in the Canyon is very advanced, while we have pointed out some of the easier beginner trails, the natural adventurer in you may demand a little more than the tourist Rim Trail, and there is plenty on offer to satisfy all appetites!
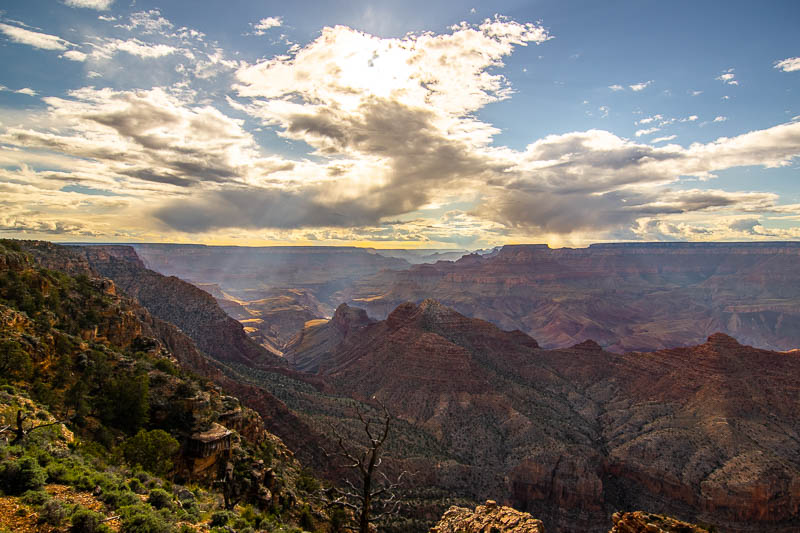
The Grand Canyon is WILD
The First thing to remember is the Grand Canyon is a protected wilderness area. This means for the most part the landscape is not developed in any way. This means it’s a raw and natural environment and one that carries an inherent risk. Many Trials are loose, uneven, and unprotected to fairly severe drops. We do not mention this just to cover ourselves from litigation but ignorance of the wild landscape accounts for hundreds of injuries rescues and deaths every year.
It is our job to help you visit America’s best tourist destinations in the best possible way. Lying nearly unconscious at the bottom of the Grand Canyon with a broken leg waiting for a rescue chopper is definitely not optimum! Even less serious errors of judgment turn a hike of a lifetime into a dull, stressful, and miserable experience.
The main keys are to know your abilities and weaknesses, understand the trails you are attempting, have backup plans and escape routes, predict the weather and carry enough provisions to last the day. We go into this in more depth below, but for now, let’s take a look at the best hikes and we will address tackling them safely below! But the main emphasis is on personal responsibility and being prepared. This is a real wilderness and help is not always on hand!
South Rim Hikes in the Grand Canyon National Park
Grand Canyon South Rim Trail

- Length – 12+ Miles (20+ km) One Way
- Duration – 5-7 Hours (Much less if you only hike portions of the Trail)
- Map – NPS Maps
- Difficulty – Easy!
- Effort – Easy-moderate
- Elevation – + 0ft
- Notes – Main Trail covers large parts of the South rim, Flat and mostly paved.
The South Rim trail is the most used trail in all of the Park, in fact, almost every one of its nearly six million annual visitors will walk along the Rim Trail at some point of their visit. That is because the Rim trial runs right along the edge of the Canyon Rim for the most part of the South Rim Park area. So if you are going up to the edge, you will automatically be on the South Rim trail, whether you know it or not.
As a Hike, it is the PERFECT trail for just about everyone. Mainly as you only need to hile as much of it as you like. Do not be put off by the 12 Miles distance of the trial. That is a substantial hike for anyone, even if it’s pancake flat and well-paved the whole way, it is still a big lump of walking. But the route is shadowed by the Parks Shuttle Bus service the entire length. So when you have had enough, you can simply rest up at a bus station and wait for the next bus back to the village. The Shuttles are even complimentary so you don’t even have to pay.
The South Rim trail is a very basic Tourist Path. The Trial is mostly fully paved and almost flat the whole way and it could be considered fairly boring if it were not for the near-constant views off to the north. The Trial follows the Rim’s edge and the scenery is simply jaw-dropping the whole way. Putting it into words is difficult. This is the Canyon at its best and the sheer size and scale are just hard to comprehend. As the trail meanders around the rim, different perspectives and vistas come in and out of view and the sheer size and scale of the Canyon are laid bare.
The Accessibility of the trail means it really is for everyone. The Trail starts at the South Kaibab Trailhead and finishes at the Hermits Rest. Extreme Hikers can carry on down the Hermits rest trail but that’s a different story. The Trial runs right in front of the Grand Canyon Village and Visitors center and links up all of the best viewpoints and vistas along the way. It is perfect for picking and choosing which parts and how much of the trail you want to hike.
Whether it’s a short meander along the best of the rim, a 24-mile all-day epic, or a starlit stroll back to the center after Sunset at Hopi Point The Rim Trail really has something for everyone!
Bright Angel Trail
Warning, These are the Parks Premier trials now, hikes down to the river and back so we have gone to some in-depth details here, enjoy!

- Length – 18.4 Miles (29km) Round Trip (12 Miles (20km) if you just hike to Plateau Point)
- Duration – 6-8 Hours (Overnight Recommended)
- Map – NPS Maps
- Difficulty – Extreme!
- Effort – Strenuous
- Elevation – +- 4980ft
- Notes – Hiking from the Rim down to the River. REMEMBER this is an out-and-back trail and the back is nearly all uphill!
A truly epic trail and one that ticks just about everyone’s Grand Canyon bucket list Boxes. Starting out at the Rim the trail descends down the canyon wall all the way to the base of the canyon at the banks of the colorado river.
The Trail follows a natural fault line in the canyon that has been used for centuries by Native Americans and more recently by miners. The trail is long due to its less severe gradient. This makes hiking the trail easier than some expect. For the most part, the trial has a shallow gradient with just a few spikes of steeper stuff. The trail is also well-made throughout and easygoing underfoot. It is also heavily trafficked and there are ranger stations partway down the cliff (Indian Garden) and again at the bottom at river level (Phantom Ranch). There are also several water stations and covered rest areas.
All in all, this makes hiking down to the river and back out just about as easy as it can be. This is not to say it’s easy, it’s a seriously long hike and a huge amount of gradient to cover in a single hike.
But it is absolutely worth the effort. The trail is utterly stunning and justifiably rewarding the entire way. The very concept of hiking from Rim-River-Rim is just so enticing to hikers it’s impossible to ignore.
The trail starts off in an enclosed side canyon, offering tantalizing views of the Main Canyon beyond, and impressive drops below your feet. After just under a mile or so you reach the edge of the canyon and the views out over the Trail below are staggering!
You then descend down the Zig Zags that lose you a lot of height quickly, before reaching the 1.5 miles rest house. If you need to use the Resthouse for water top-ups or a rest, seriously reconsider this hike! If you need water, you have not prepared correctly, If you need a rest you are well under a 10th of the way in and you are going to be in BIG trouble coming back up. This stop can be a Life Saver on the way back up, but going down you should only just be getting started.
The trail now continues down the Bright Angel Fault dropping height gradually the whole way, Most sections of this rail have stunning views out over the canyon with the steep walls looming up either side of you. A deep understanding of the scale of the canyon begins to develop.
At the 3-mile resthouse again water is available (Apr-Oct), but it’s still very early in this hike so breeze through. The trail has now lost 2000ft of elevation and you feel deep inside the canyon, views have dried up and there is a sense of being swallowed. These sections can be frigidly cold in the winter (literally never seeing the sun for months on end) and suffocatingly hot in the summer. From time to time, you get a glimpse down the fault with the vivid distant canyon colors perfectly framed by the towering walls of the Bright Angel fault.
The Indian Garden Campground lies around 4.5 miles into the hike and has water, restrooms, and covered rest areas year-round. You are just under halfway down at this point, or a quarter distance through the hike. However, as it’s all been downhill so far you have barely started! When you reach here on the return it marks the final leg and the last big push for home! The Plateau Point trail breaks off here too for those who are just day hiking and are not descending further into the canyon.
The trail takes on a very different character in the next section. Following a small creek for a mile or so the terrain becomes much greener with plants and trees surviving on the nourishing creek water. The river bed is often dry, but there is still much moisture to be eeked out of the moist soil here. This canyon creek has a very shallow gradient and is the most pleasant part of the hike in both directions. You are quite deep into a separate canyon here and you can lose track of the fact you are deep in the Grand Canyon.
At the end of the Garden Creek section, the trail falls away below you. Stunning views and the trail really plummets down the canyon walls. At the end of this descent, you are almost at river level but there is still a long hike until you hit Bright Angel Campground. First, you follow Pipe Creek until you get the first close-up sight of the river. There is a short trail down to a Colorado River beach that is worth a detour. There is also the Riverside Rest house here, but there is no water at this station.

The final section follows the mighty Colorado River, up to the two Suspension bridges that cross you over to the other side. The Bright Angel Campsite has Water, Restrooms, and a Ranger Station (Phantom Ranch). It’s quite funny but the canyon feels pretty small from down here. The scale is lost on you a little as you can only see the very lower ramparts of the canyon. The exposed rock here is unfathomably old as the river has cut its way back in time, some of the oldest layers exposed are over 2 billion years old!
The Campsite marks the halfway point, but in reality, you are a long way from halfway, we think of the turnaround as about a third of the way. The Hike back up is brutal as you recover the nearly 5,000 ft of height you just lost.
DAY Hiking – The NPS Website positively forbids people from attempting to hike down to the river and back in one day. However many people simply ignore this advice and attempt the hike regardless. The alternate Hike recommended by the NPS is the Plateau point, an offshoot from the Bright Angel trail that leads to some of the most stunning views of the whole canyon, we prefer these even more than the Rim Vistas, as the scale is even more dramatic from halfway down, as the rim wall rear up behind but still fall away below you.
It is certainly an incredible hike, but the River is definitely not out of reach to serious hikers in a single day. Fast Hikers can pull it off in a little over 6 hours, with 7-8 a more reasonable target. But it is highly discouraged as people often overestimate their ability. And this is a serious hike. There are two big dangers with the hike.
One, the hike down to the river is a doddle! This is 9+ miles of easy street! Straight down the canyon wall, usually in the cooler part of the day. After the turnaround, you are faced with 9 miles of sheer uphill slog; nearly 5000 feet, and nearly a full mile of vertical ascent. This is not to be taken lightly. Again this is likely to be in the hottest part of the day, with supplies dwindling.
The second danger is the Heat. The canyon wall acts as a pressure cooker and temps inside the canyon can soar. There is likely to be little wind, and high humidity and the canyon wall can radiate heat. This can really take its toll on tired hikers. 18-24Miles (depending on where you turn around) is a long hike for anyone in a day. But when the second half is as steep and severe as this really only very fit and experienced hikers should consider it.
Really do not underestimate the intense heat in the summer months. Even a moderate hike is hard work when the needle gets into the 110+ Degree range (43°C+) and a 9-mile hike up a 5000-foot cliff face is downright dangerous. Give yourself time, and provisions, including plenty of water, if you don’t want to be subject to a Ranger Rescue!
Camping down at Bright Angel Campsite at the bottom of the valley is a much better bet. Sleeping under one of the darkest and most stunning starlit skies is enough of a reason to do it this way in itself! Remember you will need a back-country permit for camping at Bright Angel
South Kaibab Trail

- Length – 14.3 Miles (23km) Round Trip
- Duration – 6-8 Hours (Overnight Reccomnded)
- Map – NPS Maps
- Difficulty – Extreme!
- Effort – Strenuous
- Elevation – + 4872ft
- Notes – A more direct and steeper route to the River from the rim
The South Kaibab Trail is very similar to the Bright Angel in that it starts at the rim, descends down to the River, and then you hike back up to the Rim. Where it differs is the Trail is much steeper and not as well maintained, there are no Water stations and the whole trail is quieter and more remote.
It is also for the most part far more scenic. The Bright Angel trail follows a fault line, meaning the trail is for the most part inside a canyon system. You get hints of the view and several stunning lookouts but for large parts, there is little to see but the immediate canyon. The South Kaibab Trail descends on the spine of a ridge, meaning there are simply staggering views the whole way down.
The Trailhead is at Yaki Point which offers stunning views of the Pipe Creek Side Canyon. The earth plummets away beneath your feet. You can hike out here on the Rim Trail, which terminates at the Trailhead, or use the shuttle service.
The Trail quickly drops down via some steep switchbacks before traveling along the side of the Pipe Creek Canyon. Soon you Reach Ooh Ahh Point, Named after the noises made by its visitors, a seriously stunning location and less than a mile Hike for anyone looking for a really short hike.
From here you follow Cedar Ridge and the O’Neil Butte with stupendous and far-reaching views the whole way. Eventually reaching Skeleton Point. This is the Farthest you are advised by the Park Service to hike in a Sigle day as the hike back up from here is severe but any further and it’s really brutal.
After admiring some really stunning views from Skeleton Point there is only one way to proceed, and that’s down. From here you drop right down into the Canyon finally leaving the Ridge/Butte that you have been following up to now.
After the steep descent, you hit a bit of a plateau. This is a very unique perspective of the Canyon. The Area loses its canyon feel and it’s more of a large desert landscape with towering Rock Spires. This is due to the scale of the canyon and the fact you are looking at the canyon walls at such a distance.
Finally, at the edge of the plateau, you plummet again this time down the final canyon wall right down to river level. About half-way down is a look-out where you get great views of the river, still far below despite the endless descending.
When you finally get to the river, you can cross over the stunning Kaibab Suspension bridge or hike the River Trail back to the Bright Angel Bridge, both routes take you to the Bright Angel Campsite where you can rest and replenish water supplies.
The Hike back is seriously brutal. The steep descents are murder on the way back. The trial is brutally exposed so freezing in the winter and burning hot in the desert sun in summer. As you may have noticed the Two trails have ended up in the same location, this leads to the obvious question should you hike back up the Bright Angel Trail? In a word YES!
South Kaibab – Bright Angel Trail
- Length – 17.5 Miles (28km) Point to Point
- Duration – 6-8 Hours (Overnight Recommended)
- Map – NPS Maps
- Difficulty – Extreme!
- Effort – Strenuous
- Elevation – + 4845ft
- Notes – A more direct and steeper route to the River from the rim
This is a very simple and obvious solution Once you see it to choosing which trail to hike down to the River. The South Kaibab trail is shorter and we feel it offers the best views. But that shortness comes at a cost. The trail is brutally steep at times! Hiking back up is a real leg burner. And in the heat, the exposed nature makes this a real test.
The Bright Angel, on the other hand, is a bit longer, and the scenery is often obscured by close canyon walls. On the plus, those canyon walls provide a little cover, and the longer route means a more gradual gradient which is much more manageable. There are also many rest stops, often with water stations along the whole route. The Simple solution is to hike down the South Kaibab Trail and then Back up the Bright Angel Trail.
This really gives the best of both worlds, the stunning views and short trail distance of the South Kaibab but the reduced gradient, cover, and rest stations of the Bright Angel. It also gives you 2 trails in one, and a point-to-point hike rather than an out-and-back which we always prefer.
If you are looking for a long hike down to the river and back, This is the perfect option. The only caveat is the South Kaibab trail is not as well made as the Bright Angel. It’s not a bad trail but is rougher and quite steep with exposed drops. If this is likely to be of concern to you maybe stick t the bright angel, however, if 19+ Miles of backcountry hiking is do-able for you, we doubt a little bit of rough trail will put you off!
Hermit Trail

- Length – 15.4 Miles (28km) Point to Point
- Duration – 6-8 Hours (Overnight Recommended)
- Map – NPS Maps
- Difficulty – Extreme!
- Effort – Strenuous
- Elevation – + 5114ft
- Notes – Love hiking…hate people? Maybe the Hermit is the Trail for you!
At the far end of the South Rim Trail (or the Hermit route shuttle bus) is Hermits rest. This secluded lookout point features a quaint little rest stop that was constructed in the 1910s as a faux historic oddity. It now pretty much operates as a gift shop. To be honest it can be skipped as there are better things to do with your time in the park. However, it also doubles as the Trailhead for the Hermit Trail.
This is similar to the Bright Angel and the South Kaibab Trail in that they are Rim to River hikes. The Hermit trail as the name suggests is far quieter and more remote than the headline trail and lacks any real facilities. You are out there on your own enjoying nature as it’s supposed to be.
The trail is steep and not so well made in places, the scenery is definitely unique to the trail and has a very different character from the other trials. It lacks the epic scale of the South Kaibab Trail, But still has a real sense of drama. The Sheer walls add to this and the rock formations are harsh, contrasting, and distinctive, When the CAnyon opens up the Same breathtaking views of the main canyon beyond are still to be found.
There are two campsites along the way, one at hermit creek campsite and one at the river at hermit rapids. Facilities are bare, and there is no portable water anywhere along the trail. There are sources of water but they require purification. The final section of the trial has you following hermit creek. This is easy to miss and you can end up following the Tonto Trail the leads you miles down into the belly of the Canyon
This is a rugged and wild hike and perfect for those just wanting to get away from people. You are still likely to encounter other hikers, but they will be fewer and far between and more willing to give you the space you desire, as they are probably of a similar mindset.
North Rim Hikes in the Grand Canyon National Park
North Kaibab Trail

- Length – 26 Miles (21km) Point to Point
- Duration – 8-10 Hours (Overnight essential)
- Map – NPS Maps
- Difficulty – Extreme!
- Effort – Strenuous
- Elevation – + 5150ft
- Notes – A more direct and steeper route to the River from the rim
The Premier Trial at the North Rim district of the park is the North Kaibab Trail. This is another Rim to River trail but this time it is remote, wild, and rugged. The trial is less well-maintained and far less worn-in than the South Side trails. It has a real feeling of seclusion. The Trial really takes you back in time with the feeling of hiking in the wild west era.
The Scenery is very different from the South, the trail descends down a long deep narrow canyon. This limits views and offers far less expansive visuals than the south. But it has a charm all of its own. The Bright Angel canyon is impressive by itself by any standards and while the views are not as expansive they are incredibly dramatic, the Canyon is plungingly deep and the trail leads through pine forests and scrubland that feels very different from the other parts of the canyon.
There are a couple of very worthwhile side trails, The Coconino Outlook, Roaring Springs, and the Lower Ribbon Falls. The Coconino Outlook (<1mile) offers the best views of the trail with the Roaring Springs (5.4 Miles) literally bursting from the canyon walls! The Roaring Springs is a great Day Hike destination. Further down the trail, the Lower Ribbon Falls is a delightful and unexpected sight a cooling and colorful waterfall cascading down the canyon walls. A great place for a rest.
There are several potential water stations the whole way down, Supai Tunnel, Roaring Springs, the Manzanita Rest Area, Cottonwood Campground, and Bright Angel Campground. All of which are seasonal and a bit sporadic, but there is always water at Bright Angel. Multi-Day hikers on this trail are definitely advised to bring a purification kit, and will have no problem finding water fit for that purpose!
The Trial terminates are Phantom Ranch/Bright Angel Campsite. And naturally, this begs for hikers to hike Rim to Rim, which we address below! Overall the is a long trail that meanders through a deep canyon with great side trails and places to explore. The trail begs to be taken slowly. The South rims trails suit Speed hiking with people plowing down to the river and back, but the North Kaibab is very different and a slow multi-day hike is the order of things here. Sure you can power through t bright angel and hike out the day after, but this misses the best of the North Kaibab.
Bright Angel Point
- Length – 2 Miles (3km) Round Trip
- Duration – <1 Hour
- Map – NPS Maps
- Difficulty – Moderate!
- Effort – Easy
- Elevation – + 150ft
- Notes – Very short hike out to a fantastic Rim Viewpoint

The single most popular trail at the North Rim. Mainly because the Views from the North rim Vistoer area are pretty good, but they are kind of obscured…By Bright Angel Point. This is easily remedied by a short mile-long hike out along the point to the viewpoint at the end. Here you will receive some of the best views of the canyon from the north side.
Epic Far-reaching vistas of the canyon depths are available here with a near 360 panorama of the canyon as the point is just quite far into the canyon’s innards. It is a wonderful viewpoint and if have made the effort to drive all the way to the north Rim Do not miss out on the best lookout the rim has to offer, it is only a mile hike each way. The trial is a paved path and while it gets a little hairy in places with some exposed drops these are all behind handrails and the trail is a doddle.
Even if you are planning an epic hike right down into the canyon, or even across to the other side, still take the time to hike out here as it really is a very special place, and even at sunrise/sunset it is fairly quiet, certainly compared to the packed lookouts across the canyon in the south side of the park!
There is a small rocky pinnacle that foolhardy youths like to summit to get the ultimate view and extreme selfie shots. With slippery surfaces and 1000ft drops, it should go without saying this is highly discouraged and only for those with very limited ambitions in life!
Rim-to-Rim Hikes in the Grand Canyon National Park
North Kaibab – Bright Angel
- Length – 22.7 Miles (36.5km) Point to Point
- Duration – 8-12 Hours (Overnight Essential) – 3-4 days recommended!
- Map – NPS Maps
- Difficulty – Extreme!
- Effort – Strenuous
- Elevation – + 5150ft
- Notes – A direct hike that crosses from South Rim to the North (or Vice Versa)
Hiking Rim to Rim or through hiking has even more appeal than rim-to-river hiking. This route offers an even large array of viewpoints, ever-changing scenery, and divergent landscapes, and shows the many different moods and natures of the canyon. You really are getting the full package along with a real sense of adventure and the feeling of going somewhere.
Extremely fit hikers can polish the Rim-Rim off in a single day. Not only is this a little foolhardy, especially in the summer heat, it really misses the point of the hike. This is a hike to be savored, to take slowly, and enjoy nature, the wilderness, and the stunning location. You can explore the side trails, and take time at Bright Angel Campsite and Phantom lodge to soak in the bottom of the canyon. After all the effort that goes into planning a hike like this makes it one you really need to allow time for.
And for us, this is the major downfall of through-hiking. It really is a ballache! You can easily spend more time setting up a hike like this than actually executing it. The problem is getting back to your North Rim Starting point once you clamber out at the South!
There are three options to this and all of them are harmed by the 200 miles of road that separates the two parts of the park. Sure it’s only a 22-mile hike but to drive between the two is a hell of a slog. One option is staging cars. Arrive at the south and leave a vehicle there then drive the 200 miles round to the North, again leave a car there and hike through the canyon. Then you can pick up the first car in the south and drive back to the north to collect the second car. Then dive the 300 miles or so to wherever you are based! It really is a logistical nightmare!
The second option is the much simpler Shuttle Route. This makes the whole thing far simpler and at $90 per person is probably almost as cheap, once you consider Gas and Car Rentals, along with the risk of leaving the cars unaccompanied for a few days. The Shuttle takes you from either rim to the other. We STRONGLY recommend taking the South to North Shutler BEFORE your hike. It is a long slog on a bus and not very enjoyable when tired and worn out after several days of hiking. With the excitement and anticipation of the journey ahead, the bus ride is far more tolerable.
We use Trans-Canyon Shuttles. Simply book your seat, arrive at the South rim, And spend the day exploring, then after an overnight at the canyon, hop on the early morning Transfer to the North Rim. Hike back and jump in your car and head home. Simple!
Of course, the final option is only one for the extreme lunatics! You could of course always hike back! Another 24+ Miles of extreme canyon hiking!
We have suggested Hiking up the Bright Angel trail but you can easily hike the South Kaibab trail as well if that takes your fancy more, or if you are taking the madman option, hike up the bright and down the South Kaibab. Or for a slightly milder option, just hike part of the Kaibab as a “warm-up” day-hike the day before your Transfer to the North, just enough to get the spectacular views this hike provides!
Hiking Saftey

We have already mentioned that the Grand Canyon is not Disneyland. It is a wild and Raw wilderness. Loose surfaces, unprotected drops, and extreme weather all lead to thousands of rescues every year and many unsuccessful. The Canyon has despite the Park Services’ best attempts been home to hundreds of fatalities over the year, many from falls, heatstroke, hypothermia, and drownings. All of which are preventable.
Planning
Good planning is essential to any serious hike in the Grand Canyon. The Canyon is remote and even getting there is a challenge. Plan plenty of time ahead, know your routes and carry maps, and make sure you have adequate time and leeway in your schedule. And check up-to-date weather forecasts and be ready to cancel if need be.
Know your limits
One of the biggest problems with Grand Canyon Hiking is that nearly all the hikes start out at the rim and head down. This is easy. You can quickly and easily be miles from safety with no option but a long and exhausting slog back up the hill, often at the hottest part of the day (Summer) or with the temperature plummeting and light fading fast (Winter). This gets a lot of people in trouble. A good rule of thumb is to allow double the time to hike back up as it took to descend.
Use this rule of thumb to ensure you have enough time to hike back out and make sure you avoid trying when the sun is highest, between 10-4 pm, as it really is just too hot! In winter it gets dark and cold early and conditions can slow you down considerably. Plan extra leeway into your plans and don’t hike at night, especially at higher elevations where snow and ice are more likely.
Kit
Summer – summer is all about lightness. A light pack, lightweight water bottle, high-density foods, and loose-fitting light clothing. A lightweight technical long-sleeved top helps keep the sun off but keeps you cool, and a light cap or headwear can actually keep you cooler than a bare head.
Always wear suitable shoes, you are unlikely to encounter mud so lightweight boots are great or trail running shoes offer good grip ad some ankle support but are still lightweight and cool
If you are overnighting a large heavy tent is necessary. Consider just the fly or a superlight bivvy bag or tent and a super lightweight sleeping back and mat is sufficient. You won’t need a stove as hot food is far from essential in the heat of the canyon.
Winter – Winter is all about warmth. But you need to keep your mind on lightness too. You are carrying everything you need. So a nice warm tent, sleeping bag, ground mat, Stove, water food extra clothes, etc, is going to really slow you down hiking out.
Staying warm is easy while moving but if you need to stop, maybe due to injury, the cold sets in FAST. Always have enough clothes to ride out prolonged periods of inactivity even if only hiking short distances. A space blanket is a great way to keep warm in an emergency while only adding a little weight.
Water
In the winter water is important but far less so than in the summer. Carrying enough for a full-day hike is tricky though a good two liters a day is sensible and that’s heavy! There are plenty of water stations on the busy routes, and you can plan to use these to top up supplies along the way.
These are not guaranteed though. so some purification pills, and the knowledge to find clean water, and how to use them are advised for long hikes.
Also, Water alone is dangerous in the heat of the canyon. Carry some electrolyte tabs to help turn plain water into electrolyte drinks to top up your salts. The best advice in summer is to drink to thirst. Forcing water can lead to a dangerous condition, HYPONATREMIA (water intoxication), where the body’s salts are too low and this leads to organ damage and even death! Avoid drinking too much and don’t drink pure water alone.
In the winter, drinking enough can be tough. The cold weather really makes people reluctant to drink. However with warm clothing and hard work, people still sweat profusely and lose salts and water. Drinking is just as important, so make a plan and make sure you keep on drinking even when you really don’t want to.
Food
Anyone who has bonked will know lack of calories while exercising is little fun, to face this at the bottom of the canyon with miles of steep trail to contend with is unthinkable. Carrying plenty of food and eating regularly is essential.
Energy-dense food is perfect. This is the time when you really can eat junk and it is ok. Chocolate bars, Candy, Granola Bars Energy Bars, etc are all great along with a few bags of chips (Some Salty food is great). Anything that is full of energy, easy to eat, and convenient is perfect. Just remember to take regular breaks and eat little and often. And do we need to say, take your trash home?
Back-Up Plans
Having a detailed plan is great, but these invariably fail to hold up in battle. Having backup plans, alternate routes, different campsites, knowledge of other water sources, etc.. all help to get you out of a fix if the original plan falls apart.
Fallback options are also great, plan in plenty of leeways and be ready to turn back or call time on your hike if you are just not going to make it back out or hit your checkpoint. If a section is going to take 2 hours, plan on 3. If you are not sure you can make it somewhere on time, assume you won’t and rely on the fallback option. Pushing on into increasing uncertainty is little fun.
Warning Signs
On the same note, listen to your body. Look out for signs things are not going well. This can help you turn back in time instead of pushing on. Things seldom get better, so if you start feeling faint, dizzy, weak, nauseous, don’t just power through it. Try eating, drinking, taking a rest cooling down, and most of all DO NOT keep pushing further into the wilderness.
Weather
The next section goes into more detail but understanding the Canyon weather is essential for safe hiking. Detailed and accurate forecasts are essential, along with a willingness to accept the weather just isn’t going to allow your hike to go ahead.
If serious heat, cold or violent storms are forecast you are far better postponing than pushing on. Not just for safety reasons, but more clement weather makes hiking far more enjoyable. Too many refuse to be beaten, hike regardless of the forecast, and end up in trouble due to their stubbornness.
This goes for on the day too. If you are hiking and things take an unexpected turn, don’t just press on regardless. Be willing to hunker down, or turn back to ride out the weather. This goes back to ensuring adequate leeway and fall back options. Things rarely go to plan.
Grand Canyon Weather

The main thing to consider about the weather in the Grand Canyon is the variability. The CAnyon is a place of extremes and these can manifest themselves simultaneously in different parts of the canyon throughout the day. The Canyon takes on two very different personas depending on the season.
Summer
In summer the canyon gets scorchingly hot. Temperatures on the rim are very hot, well over 100°F (37°C). This is enough to slow anyone down and make even simple tasks hard work. However, this is not nearly as hot as it gets inside the Canyon, where the serious hard work is done!
At lower elevations and in the more enclosed and sheltered canyon walls the temp’s skyrocket. highs of 106°F (41°C) are common, and even then these are averages. In certain parts of the canyon on the hottest days, the Pressure Cooker of the canyon can see Death Valley-style heat. 110°F (41°C) can be recorded in the shade but in direct sun, and enclosed canyon walls the effect on the body can be devastating.
It really is hard to understand what this feels like, especially while attempting to hike a steep canyon trail, without constant rest, cooling, and drinking, even very fit people will get in trouble fast!
Winter
In the Winter the Canyon could not be more different. The High Elevations of both rims means the area gets a proper North American winter. Temperatures at the rim can even hit -2°F (-18°C) which is seriously cold, but the exposed nature of the rim areas means Windchill can make this far worse and a serious danger to unprepared hikers!
Large Snow Storms roll in from the pacific and dump huge amounts of snow on the area, getting caught in a canyon snowstorm is no fun. On top of this Deep canyons mean snow and ice persist for months as they get little sun to help warm and melt the ice. This makes some trails dangerously slippy and when exposed to severe drops they can be lethal!
Extreme care and preparedness is needed if hiking in winter.
Spring and Autumn
Naturally, this leaves the Spring and Autumn as great seasons to hike the canyon. Temperatures are climbing and snows melting but the heat is not so high that heat exhaustion and stroke are big issues yet.
Have Your Say
Let us know your favorite Grand Canyon Hikes. Do you prefer the North or South Rim? Have you done several of the Main hikes which are your favorite? Maybe you have hiked another trial that you think deserves to be mentioned? Whatever you have to say about the Hikes in Grand Canyon let us know below and if you have any questions feel free to ask in the comments.

Since I will be traveling to the grand canyon in a few months, this is literally the perfect article that I have found. It is so well-written and thorough and I have not been able to find an article as easy to understand while also as informative as this one. Thank you so much, I will be saving this article for when I go to the Grand Canyon
Hi, Misael,
Hope you have a great time in the Park, we can’t wait to get back there again. Still grounded in our home country atm 🙁
Great to hear you enjoyed our article, hope you find it helpful and useful in planning your Grand Canyon adventures.
Thanks
Steve
This is the one place that I have always wanted to go to but haven’t (yet). I’m bookmarking this so I’ll have an idea of what I want to hike when I get there! The South Kaibab – Bright Angel Trail looks beautiful but I think I would stick to the tamer hikes starting with the Bright Angel Point, just to get a feel for things. After that, I would probably take Grand Canyon South Rim Trail. I like the fact they have shuttles so I can hitch a ride back if I want to!
You must know by now that I’m not much of a hiker but living in the White Mountains, I am familiar with people who overestimate their time and abilities. This leads to many a lost or injured hiker every year (as you also note). I couldn’t look at my friends in the eye again if I were to become one of “those” people!
Thanks for posting this great information!
Hi Cynthia,
I think 2020 has inspired many to stop putting off going places, we may end up never getting there! So hope things open up for everyone soon and you can take that bucket list trip! The Beauty of the easier trail at the GC is they are just as fantastically beautiful as the more taxing, due to the unique fact you are starting so high up.
We also live in a mountainous district and hear tales of lost and exhausted hikers all the time too, along with the helicopter rescues and Mountain Rescue teams always being kept busy. However, the Canyon has double the possibilities for hikers getting in distress than mountain areas. At least with a mountain, the hardest part comes first! Once you get to the summit at least it’s downhill on the way back. With the Canyon, it’s so easy to hike miles down into the abyss and only realize the difficulty when you finally turn around!
Although Summit fever is another problem with mountain hikes, it is still just that bit more forgiving when the way back is down! Again the heat is also an issue as it can feel nice and cool on the Rim but once you drop down into the Furness it goes up several notches, and it’s all uphill to get out!
You clearly have a sensible attitude to this and know your ability, the Rim hikes are utterly breathtaking, and as you say you can just hike until your done and jump on a shuttle back!
Thanks for reading,
Hope you get there soon
Steve
Haha thanks for the article my guy! To be completely honest with you, I actually really liked this article. I’m an active and adventurous person myself, so I’m very intrigued by hiking in the Grand Canyon. Not to mention, I already love hiking. I hiked up a mountain once in Puerto Rico and I loved it 🙂 I plan to make a trip out to Las Vegas soon, so I’ll definitely make sure to stop here!
Hi,
You definitely will not be disappointed with the Grand Canyon. It’s a long drive from Vegas but definitely worth it!
Hope you make it there soon and have a great time
Steve
I have always wanted to visit the Grand Canyon ever since I was young, you hear so much about it. The hiking looks really spectacular, I can just imagine hiking down to the river that looks so amazing, I am not sure I would be up to the challenge but it’s certainly something I want to try.
This article has got me so excited and I can wait to visit next year, all this Pandemic stuff has really got me thinking about getting round to actually visiting the places I have always dreamed of
Hi,
Great to hear you are thinking of visiting the canyon. If you are not sure of your capabilities it’s definitely advisable to only attempt the day hikes. The bottom of the canyon is a really long way and once the heat gets up hiking up the canyon wall is a real ask, people get in trouble all the time by underestimating it!
Hope you have a great time and stay safe
Steve